After a flood, your structure can feel like a sponge, saturated and vulnerable. Implementing effective structural drying techniques is vital to mitigate damage and prevent mold growth. Understanding the right methods and equipment is fundamental for the best results. You’ll want to know how to assess water damage, improve airflow, and monitor moisture levels. What steps can you take to ensure a thorough and efficient drying process?
Key Takeaways
- Begin drying within 24-48 hours to prevent structural damage and mold growth.
- Use moisture meters to assess water damage and track moisture levels in materials.
- Employ a combination of dehumidifiers and air movers to enhance moisture removal efficiency.
- Ensure proper airflow by positioning fans for cross-ventilation and elevating furniture.
- Maintain low humidity and use antimicrobial treatments to inhibit mold growth post-drying.
Understanding the Importance of Structural Drying After a Flood
When a flood occurs, the urgency of structural drying can’t be overstated, as it plays a vital role in preventing long-term damage to your property.
Understanding flood consequences is essential; water can compromise structural integrity, promote mold growth, and damage electrical systems. You need to act swiftly to minimize these risks.
The drying timeline is significant—ideally, drying should begin within 24-48 hours post-flood to reduce damage. Utilizing professional drying techniques ensures that moisture is effectively removed from walls, floors, and ceilings, protecting your home from secondary issues.
Step-by-Step Drying Guide for Building Materials
To effectively dry building materials post-flood, start by evaluating the severity of the water damage.
This evaluation helps you determine the right drying equipment needed for the job.
Selecting appropriate tools ensures a more efficient and thorough drying process.
Assessing Water Damage Severity
Although evaluating water damage severity may seem challenging, it’s crucial for effective drying and restoration.
Start with a thorough water damage assessment to identify the affected areas. Check for visible signs like discoloration, swelling, or mold growth.
Next, use moisture meters to measure the moisture content in building materials, which helps gauge the flood impact evaluation accurately. Document your findings to track progress throughout the drying process.
Pay attention to hidden spaces, such as behind walls and under flooring, as water can linger there.
Understanding the severity of water damage helps choose appropriate drying methods and ensures a more efficient restoration process, fostering a sense of community and security for everyone involved.
Choosing Drying Equipment Wisely
Choosing the right drying equipment is essential for effective water damage restoration, as using inappropriate tools can prolong the drying process and exacerbate the damage.
Start by evaluating the equipment types available, such as dehumidifiers, air movers, and heaters. Each type plays a unique role in enhancing drying efficiency. For instance, dehumidifiers reduce moisture levels in the air, while air movers circulate air to speed up evaporation.
When selecting equipment, consider the size of the affected area and the severity of the water damage. Using a combination of these tools often yields the best results.
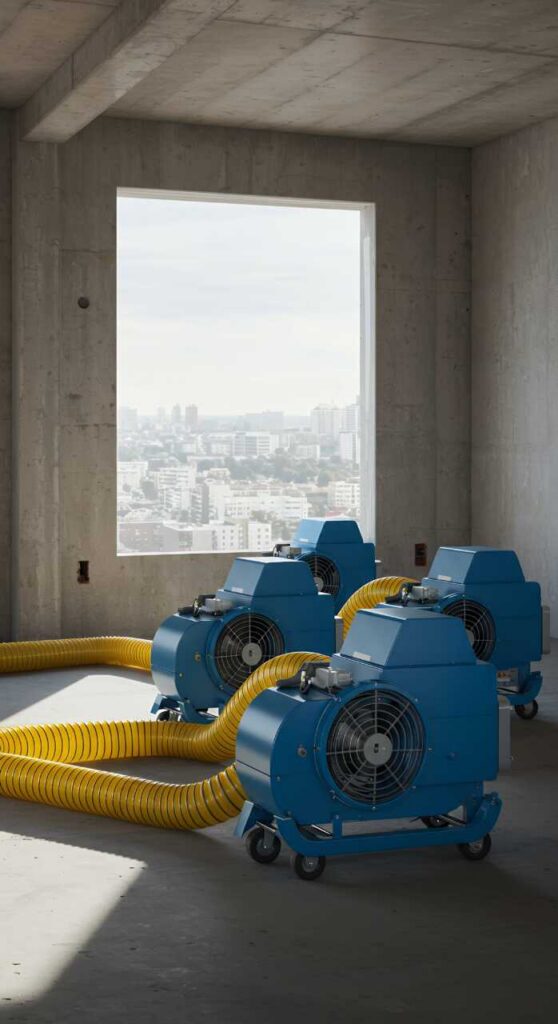
What Equipment Do You Need for Structural Drying?
When tackling structural drying after a flood, having the right equipment is essential for effective moisture removal and damage prevention.
You’ll need to choose suitable dehumidifier types for your space, as they help extract excess moisture from the air. Additionally, strategically placed air movers ensure ideal airflow, facilitating faster drying.
Dehumidifiers: Select ones with the right capacity for your area.
Air Movers: Use high-velocity fans to enhance evaporation.
Moisture Meters: Monitor moisture levels to assess progress.
How to Improve Airflow for Faster Drying
Effective airflow is vital for achieving faster drying after a flood. To enhance drying efficiency, employ various airflow techniques.
Start by positioning fans strategically to create a cross-flow of air. This helps to circulate air around wet surfaces, promoting evaporation. Use dehumidifiers in tandem with fans; they’ll extract moisture from the air, allowing for quicker drying.
Make sure windows and doors are open whenever possible to facilitate natural ventilation. You can also elevate furniture and belongings to enhance airflow beneath them.
Finally, regularly check and adjust your airflow setup based on the drying progress, as fine-tuning is essential for ideal results. By implementing these techniques, you’ll greatly reduce drying time and restore your space effectively.
How to Monitor Moisture Levels Effectively?
To ensure a thorough drying process after a flood, it’s essential to monitor moisture levels accurately.
Using the right tools can make a significant difference in your restoration efforts.
Moisture Sensors: Place these in key areas to detect hidden moisture in walls and floors.
Humidity Gauges: Regularly check indoor humidity levels to prevent excess moisture buildup.
Regular Inspections: Perform frequent checks to ascertain drying is progressing as expected.
How to Keep Mold at Bay After Drying
To prevent mold growth after drying, you need to maintain low humidity levels in the affected area.
Implement effective ventilation techniques to increase airflow and reduce moisture accumulation.
Additionally, using antimicrobial treatments can provide a proactive approach to inhibit mold spores from taking hold.
Maintain Low Humidity Levels
While drying out your space after a flood is essential, maintaining low humidity levels is equally important to prevent mold growth.
Effective humidity control and moisture management can make all the difference. Here are a few strategies to keep humidity levels in check:
- Invest in a dehumidifier to extract excess moisture from the air.
- Monitor indoor humidity with a hygrometer to ensure it stays below 60%.
- Seal any leaks or cracks in your home’s structure to prevent moisture ingress.
Use Proper Ventilation Techniques
Proper ventilation techniques are essential after a flood, as they help facilitate airflow and reduce moisture buildup, which are key factors in preventing mold growth.
Start by implementing effective ventilation strategies, such as opening windows and doors to promote natural air circulation. Use fans to direct the flow of air throughout affected areas, ensuring that damp spots receive adequate airflow.
Additionally, consider dehumidifiers to extract excess moisture while maintaining air movement. It’s also crucial to monitor indoor humidity levels, aiming for a range between 30-60%.
By prioritizing these ventilation strategies, you’ll create an environment less conducive to mold development, fostering a healthier space for you and your loved ones.
Apply Antimicrobial Treatments Effectively
Once you’ve effectively dried the affected areas, applying antimicrobial treatments is vital in keeping mold at bay. Proper antimicrobial application prevents future growth and safeguards your home and health.
Before you start, ensure thorough surface preparation to maximize the treatment’s effectiveness.
- Clean and remove any debris from surfaces.
- Use the appropriate antimicrobial solution for your specific needs.
- Apply the treatment evenly, covering all surfaces thoroughly.
Frequently Asked Questions
How Long Does Structural Drying Typically Take After a Flood?
Structural drying typically takes 3 to 7 days, depending on the drying timeline and extent of water damage. You’ll want to monitor humidity levels closely to ensure efficient, effective drying throughout the process.
Can I Dry Out My Home Without Professional Help?
Yes, you can dry out your home without professional help. Use DIY drying methods like fans, dehumidifiers, and open windows to reduce home moisture. Ensure thoroughness to prevent mold and long-term structural damage.
What Are the Signs of Successful Structural Drying?
You’ll know structural drying is successful when moisture measurements show levels returning to normal and drying equipment operates efficiently. Look for reduced dampness, no musty odors, and surfaces feeling dry to the touch—these are great indicators!
Is It Safe to Stay in My Home During Drying?
It’s not always safe to stay in your home during drying. Conduct a thorough home evaluation for flood safety; if structural damage or mold is present, consider relocating until professionals ensure a safe environment.
What Should I Do if I Notice Mold After Drying?
If you spot mold, treat it like an uninvited guest. Act quickly: clean the surface with a mold-killing solution, ensure proper ventilation, and follow remediation steps to prevent future growth and safeguard your home.
Review
In the aftermath of a flood, imagine transforming your damp, compromised space into a safe, dry haven. By implementing these top techniques for structural drying, you protect your building materials and create an environment free of lurking mold. Staying vigilant with moisture monitoring and employing the right equipment ensures you’re not just drying—you’re safeguarding your home. Embrace these strategies, and watch your space rejuvenate, ready to welcome life back in with open arms.