
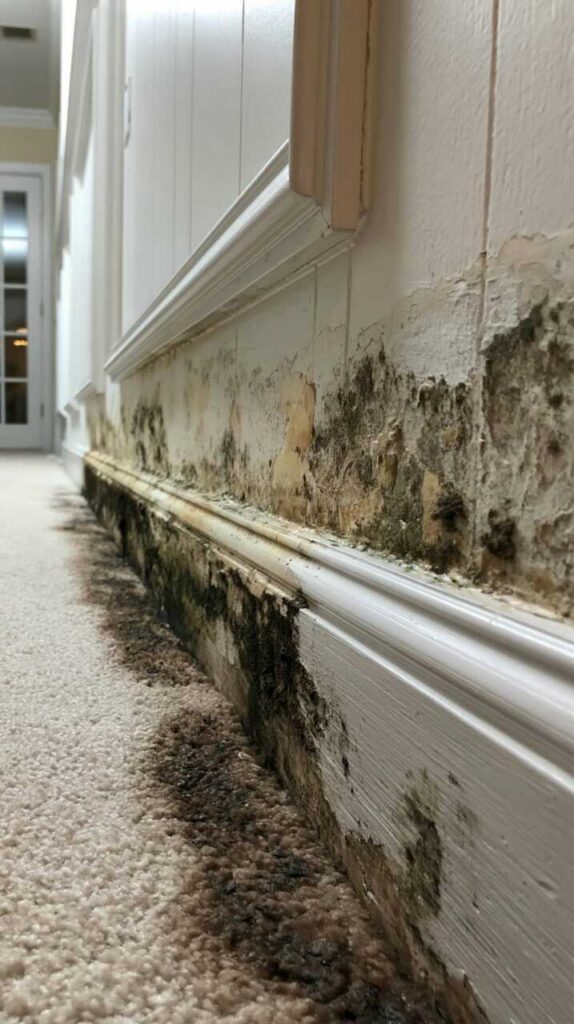
When a pipe bursts, what looks wet may already be a mold problem in disguise. You should put on protective gear, seal off the area, and inspect visible damage first. Use a flashlight, moisture meter, and infrared scan to find hidden moisture in walls, floors, and ceilings. Then document everything and test suspect surfaces, because the real extent of the damage may be farther than it seems.
Key Takeaways
- Wear protective gear, seal off the area, and turn off HVAC to limit exposure and spore spread.
- Document visible water damage, mold growth, and affected boundaries with photos and notes.
- Check hidden moisture in drywall, baseboards, subfloors, and framing using moisture meters and infrared scanning.
- Sample suspicious areas if needed, label all tests clearly, and keep records for insurance and repairs.
- Dry materials within 24 to 48 hours and call professionals for large, recurring, or hidden mold problems.
Start With Mold Safety
Before you inspect any visible growth, you need to protect yourself from mold exposure. Put on protective gear: N95 respirator, gloves, goggles, long sleeves, and disposable shoe covers.
Seal off the area if you can do it safely, and keep children, pets, and other household members away. Open windows only if outdoor air is dry and you won’t spread debris. Turn off HVAC systems that could move spores through shared spaces.
Bring a flashlight, a notepad, and a camera so you can document conditions without touching surfaces.
Follow mold safety tips by avoiding direct contact, skipping bleach, and never dry-brushing material.
You’re not handling this alone; you’re building a safer, controlled inspection space that protects your crew and home.
Inspect Pipe Burst Damage
First, you should document all visible damage from the pipe burst, including staining, warped surfaces, and soaked finishes.
Next, check for hidden moisture behind walls, under flooring, and inside cavities with a moisture meter or thermal inspection.
Then map the affected materials so you can track what needs drying, cleaning, or removal.
Visible Damage Assessment
Start by inspecting the burst area for visible water damage, mold growth, and material deterioration. You should document staining, warping, bubbling paint, soft drywall, and swollen trim, because these signs show how far the leak spread.
Use mold identification techniques by noting color, texture, and pattern: fuzzy green patches, slimy dark colonies, or powdery spots often indicate active growth. Check nearby corners, baseboards, and exposed framing for mold growth conditions such as dampness, poor airflow, and organic debris.
Photograph each affected surface, then mark boundaries with painter’s tape so you and your remediation team can compare changes later. If you spot crumbling materials or persistent discoloration, treat the area as compromised and plan prompt cleanup.
Stay methodical; clear records help your crew act with confidence and keep everyone aligned.
Hidden Moisture Checks
Even when surfaces look dry, you need to check for hidden moisture because water from a burst pipe often travels behind walls, under flooring, and into insulation.
Use moisture meters to test drywall, baseboards, subflooring, and framing at several points, then compare readings with unaffected areas.
Scan broad surfaces with infrared cameras to spot cooler zones that can signal trapped water.
You should probe around seams, outlets, vents, and cabinet backs, where leaks often linger.
If readings stay elevated, document the exact spot and retest after short intervals to confirm it isn’t just surface evaporation.
Work methodically, because thorough checks help you protect your home and make smart cleanup decisions with confidence.
Affected Material Mapping
Map the affected materials before you remove or dry anything, so you can trace how far the burst pipe spread water and which components need inspection.
Mark walls, trim, insulation, subfloor, and contents on a simple floor sketch. Note staining, swelling, delamination, and soft spots, because those signs show where moisture sources traveled. Check porous materials first; they often hold water longest and support mold types that spread fast.
- Label each wet zone by room and height.
- Photograph damaged materials before handling them.
- Separate salvageable items from disposable ones.
- Compare odors, stains, and readings across surfaces.
When you map damage this way, you’ll work with your crew more confidently and avoid missing hidden contamination.
Find Hidden Mold After A Pipe Burst
After a pipe burst, you need to inspect areas that water can reach but you can’t easily see, because hidden mold often grows inside wall cavities, under flooring, behind baseboards, and in insulation.
Use a moisture meter to compare wet and dry zones, then note any persistent readings above normal. Look for staining, musty odor, swelling, or soft surfaces.
Different mold types may colonize cellulose, drywall, and dust, and some raise health risks for sensitive occupants. Keep your inspection systematic so you can document every suspect pocket and share the same standard with anyone helping you.
Remove access panels if available, and check around penetrations, cabinets, and HVAC returns. If you find concealed dampness, isolate the area, dry it fast, and arrange professional remediation before spores spread further.
Check Walls, Floors, And Ceilings
Inspect the wall surfaces for staining, blistering, discoloration, or soft spots that can signal moisture intrusion and mold growth.
Check ceilings for sagging, water rings, and paint failure, since these often show hidden damage above the surface.
Then examine floors for warping, cupping, buckling, or damp subflooring, because trapped moisture can spread mold quickly.
Wall Surface Stains
Wall staining often gives the first visible clue that moisture has migrated beyond the burst pipe area. You should inspect paint, drywall, and trim for wall discoloration causes such as mineral deposits, hidden seepage, and microbial growth.
Note edges, corners, and any bubbling, because stains often map the water path. Use these stain removal techniques only after you verify the wall is dry and stable:
- Compare affected areas with adjacent clean surfaces.
- Mark stain boundaries to track spread.
- Check for soft spots or peeling finish.
- Photograph findings for your restoration team.
If the stain darkens, expands, or smells musty, you’re likely seeing active moisture.
Stay methodical; your careful scan helps your crew make faster, safer repair decisions.
Ceiling And Floor Damage
Ceilings and floors often reveal hidden spread fast, so check them early for sagging drywall, stained tiles, warped boards, and soft or spongy spots.
You should press gently along seams and joists to confirm whether the surface feels firm or gives way.
On ceiling materials, look for discoloration around vents, light fixtures, and fasteners, since trapped moisture often collects there.
With floor types, inspect vinyl, laminate, hardwood, and tile for cupping, lifting, grout cracking, or delamination.
Use a moisture meter if you have one, and mark any readings above normal so you can compare them later.
If you find odors, bubbling, or repeated dampness, document each area and keep your repair team informed.
Acting together helps you catch damage early and protect the whole space.
Test Air And Surface Samples
If you suspect hidden mold after a pipe burst, you should collect air and surface samples to confirm what’s present and how far it has spread.
Use a calibrated cassette sampler for air quality, and swab or tape-lift damp drywall, trim, and framing for mold testing. You’ll get the clearest picture when you sample before cleaning or drying starts.
- Sample rooms with musty odors first.
- Compare indoor and outdoor air samples.
- Label each site, date, and material.
- Send samples to a qualified lab promptly.
These results help you target cleanup, verify contaminated zones, and avoid guessing.
When you work methodically, you’re protecting your space and your people.
Document Mold Damage For Insurance
Start a thorough record of the damage before any major cleanup begins. You should photograph every affected room, wall, baseboard, and ceiling from wide and close angles, then add date stamps and notes.
Include the source of the burst pipe, visible staining, warped materials, and any musty odor you detect. Keep mold documentation organized in one folder with receipts, inspection reports, moisture readings, and a room-by-room inventory of damaged items.
Write down when you found the problem, who you notified, and any temporary actions you took. This evidence helps you support an insurance claim and shows you’ve handled the situation carefully.
Share copies with your adjuster, but keep the originals safe. Clear records make your next steps easier and help your household stay aligned.
Dry Out Affected Areas Fast
Once you’ve documented the damage, move quickly to reduce moisture so mold has less time to spread. Open windows only if outdoor air is dry, then set fans to push air across wet surfaces, not into walls.
Use dehumidifier usage in the smallest safe setting you can maintain, and empty the tank often to keep quick drying steady. Stay with your cleanup team and check hidden spots behind baseboards and under rugs.
- Remove soaked materials that won’t dry fast.
- Lift furniture to expose wet flooring.
- Separate damp items for faster airflow.
- Monitor humidity until surfaces feel dry.
You’re not just cleaning; you’re protecting your space with disciplined, fast action.
When To Call Mold Experts
When mold shows visible growth larger than about 10 square feet, keeps returning after drying, or appears inside HVAC ducts, wall cavities, insulation, or other hidden spaces, you should call a mold remediation expert.
You’ll get a targeted assessment, and you won’t have to guess about mold types or spread. A qualified team can identify affected materials, measure moisture, and confirm whether the contamination is active or residual.
You should also call right away if you notice musty odors, staining that expands, or health effects such as coughing, eye irritation, or worsening asthma after the pipe burst.
If you’re unsure, trust the signs and bring in help early. Acting with your household or workplace community keeps everyone safer and limits unnecessary exposure.
Prevent Mold After Future Pipe Bursts
To reduce the chance of mold after a future pipe burst, you should control moisture before it lingers. You can protect your space with mold prevention strategies that fit your home and schedule.
Inspect supply lines, shutoff valves, and joints monthly, and replace worn hoses before they fail. Keep your water pressure within range, because excess pressure stresses fittings and raises leak risk. After any spill, dry walls, subfloors, and insulation within 24 to 48 hours.
- Seal gaps around pipes with approved caulk.
- Install leak detectors near appliances and in basements.
- Insulate cold pipes to limit condensation.
- Add plumbing maintenance tips to your seasonal checklist.
When you act early, you keep your home safer and join a community of owners who prevent damage before it spreads.
Frequently Asked Questions
How Long After a Pipe Burst Does Mold Start Growing?
Mold can start within 24 to 48 hours after a pipe burst. You should dry affected areas fast, because the mold growth timeline accelerates in the pipe burst aftermath, especially in damp, enclosed spaces.
Can Mold Appear Inside Insulation After Water Damage?
Yes—mold can hide inside insulation after water damage, because it’s basically your walls’ unwanted hobby. You should check insulation types, dry them fast, and use mold prevention steps to protect your home and community.
What Color Is Mold From a Burst Pipe?
Mold from a burst pipe can be white, gray, green, black, or brown. You’ll use mold identification techniques and note color variations, but moisture, texture, and odor matter too for accurate confirmation.
Does Homeowners Insurance Cover Mold Testing Costs?
Usually, you’ll need to check your policy; some homeowners insurance covers mold testing costs if the damage stems from a sudden covered loss. Document everything, follow the insurance claim process, and use mold prevention strategies.
Can I Stay Home While Mold Cleanup Is Happening?
You can stay home only if professionals seal the area and keep your mold safety protected; otherwise, leave. Ask about the cleanup timeline, ventilation, and containment, and follow their instructions closely.
Conclusion
You should stay safe, scan the scene, and spot signs of mold right after a pipe bursts. Use protective gear, check walls, floors, and ceilings, and search for hidden moisture with meters or infrared tools. Sample air and surfaces, then save clear photos and notes for insurance. Dry wet areas fast, and call mold experts if damage spreads. Quick, careful cleanup and consistent checks help you stop mold growth before it starts.